Nerdminer Setup Instructions
Configuring the NerdMiner:
You will firstly need to configure the device to connect to your Wi-Fi network and enter a bitcoin address where you wish to receive your block reward to if your NerdMiner finds a block.
1. On your computer or mobile phone, connect to the Wi-Fi network provided by your Nerdminer device. You can achieve this by either scanning the QR code displayed on the screen or manually scanning for the Wi-Fi network and logging in using the credentials below:
The SSID is: NerdMinerAP:
The Password is: MineYourCoins
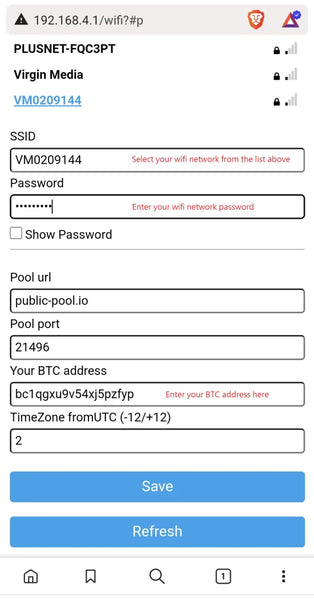
2. Open a web-browser, you should be automatically re-directed to a set-up page. If you aren’t automatically re-directed simply manually navigate to 192.168.4.1 in a the browser.
you should see this screen:

3. Click the “Configure Wi-Fi” option and provide the requested information on the screen. This includes selecting your Wi-Fi network (click the "Refresh" button should your wifi networks not display at the to of the screen), entering the Wi-Fi network password, and specifying the bitcoin address for receiving mined bitcoin in the event of discovering a block, we suggest a seg-wit address starting bc1q (Note; taproot addresses starting bc1p don't currently work with the default public-pool). The pool settings are pre-set to public-pool.io, but you can customize them according to your preferences.
The fields annotated with red text on the image below are the 3 fields you need to configure.
3. In the event that you discover a valid block, you will receive the full block reward to the address provided. (excluding a small fee that will be directed towards the solo mining pool, this differs between pools but expect around 2%).
4. Once you have entered all the necessary information, click “Save,” wait for a moment, and then restart your device.
5. You should now be able to view the Nerdminer main screen. Where you should see how many KH/S your NerdMiner is producing. Use the buttons to navigate as described below:
Top Button:
- Single click: Enables screen switching (only functional with firmware version 1.5 or higher).
- Press and hold for 5 seconds: Initiate a reset of your configurations and restarts the device.
- Hold and power up: Activates the configuration mode, granting access to modify the current configuration via Wi-Fi or adjust/verify settings.
Bottom Button:
- Single click: Turns the screen off and on.
- Double click: Alters the orientation (default is USB-C positioned to the right).
Centre Button (if present):
- Hard Reset: Caution! Only press this button if you intend to erase all data on your device.